Tatsujin Beam in Truxton Extreme
Forward-focused pierce power — positioning lines, boss phase damage, and tradeoffs versus wide shots.
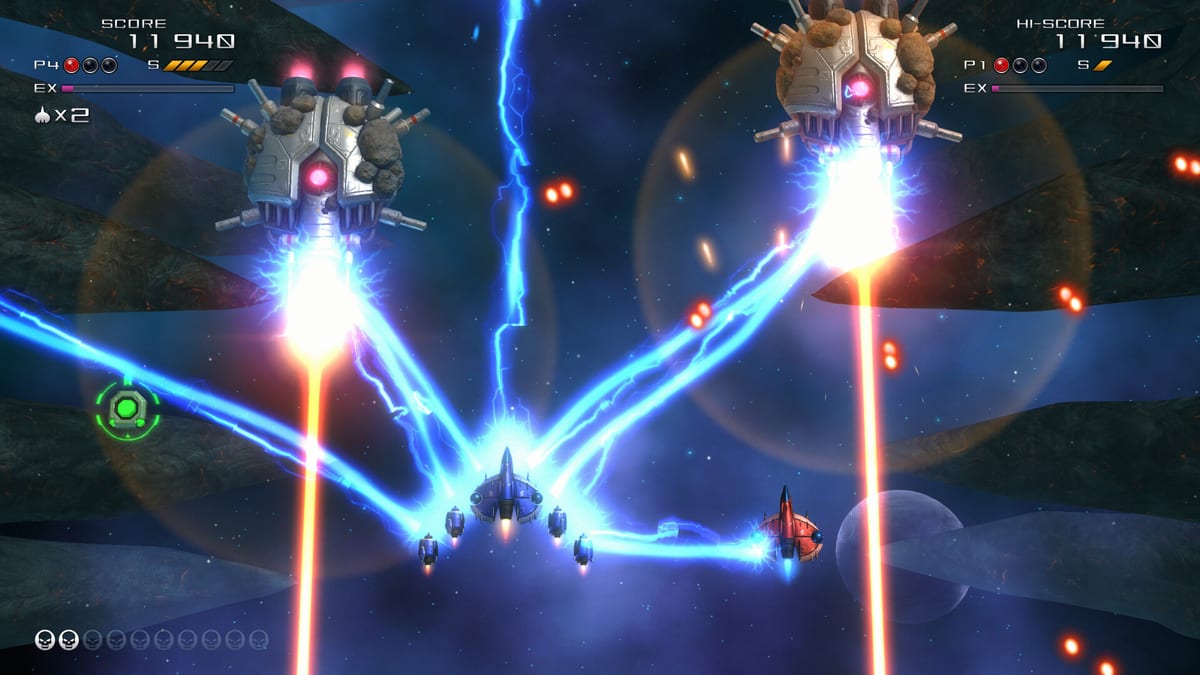
The Tatsujin Beam — also marketed as the Truxton Beam in Steam and trailer copy — is Truxton Extreme’s forward-focused primary weapon. It concentrates firepower in a high-damage line straight ahead, rewarding players who can hold a stable vertical lane while piercing through stacked enemies. Clear River Games and Tatsujin position this shot type as the expert’s tool: less forgiving than Power Shot, but faster at deleting single-file columns and boss segments when your positioning is correct.
Beam players should already understand movement and manual speed boost from How to Play and the controls reference. If you are still dying to basic patterns in Heart Starter, build fundamentals with a wide or homing weapon before committing to beam-only credits in Arcade.
How the beam works
Tatsujin Beam emphasizes forward power over lateral spread. Enemies aligned in a vertical stack take repeated pierce damage as long as your ship sits on the correct horizontal line. Off-center targets at the screen edges may receive no damage at all, which is the beam’s central skill check.
The beam does not lock on like Thunder Laser; you must physically stay aligned. It does not track stragglers like Homing Shot. It does not area-burst like Star-Mine Shot. Mastering beam means knowing when those other tools would save more time than stubborn beam holding.
Strengths
Boss weak points. Many boss legs and cores expose narrow hit windows. Beam’s concentrated line maximizes damage per second when you find the safe pocket that keeps the line connected.
Arcade pacing. Continuous stage chains in Arcade and Training reward learning one optimal line per segment and repeating it. Beam clears vertical shafts quickly once routed.
EX Shot amplification. EX Shot adds temporary fire density. On beam, EX windows feel like supercharged pierce phases — excellent during boss vulnerability or when a dense column enters your exact lane.
Score efficiency. Fewer wasted bullets on off-lane enemies means higher effective DPS on targets you care about, provided you do not spend seconds repositioning for side spawns.
Weaknesses
Split formations. When enemies arrive from both upper corners simultaneously, beam players must choose a lane and let the other side survive longer — or switch weapons.
Learning curve. New players drift horizontally while dodging, breaking beam connection constantly. This is why beam sits A tier in Story but S tier in Arcade on the weapon tier list.
Bullet curtains without bombs. Beam does not clear hostile projectiles. Dense patterns still require dodging or a timed Bomb; do not assume high forward damage substitutes for defensive items.
Positioning and speed boost
Hold your horizontal position during pierce segments; use short speed-boost taps for vertical dodges rather than sweeping diagonally through the whole playfield. After a dodge, return to the pre-planned line as quickly as possible — beam DPS is zero during repositioning.
On stages with drifting background geometry, anchor to enemy spawn cues instead of visual landmarks. Truxton Extreme’s 3D presentation can mislead depth perception; trust bullet origin points over decorative scenery.
When to pick or switch beam
Grab Tatsujin Beam when upcoming enemy data shows vertical columns, narrow boss parts, or long straight corridors. Switch away when the next segment features wide split formations or scattered popcorn that Homing Shot clears faster.
In Story mode, beam accelerates episode clears once you know setpiece layouts. In Arena, beam is often B tier because scattered targets under time pressure reduce pierce value — unless the Arena stage packs a single central cluster.
Co-op and Team mode
In Team co-op, beam works well when roles split: one player beams the boss core while a partner runs Power Shot or Homing for adds. Avoid both players stacking center on beam — overlapping lines do not double pierce value and shrink collective screen awareness.
Shared bombs mean the beam player can request a bullet cancel before committing to a greedy line — communicate before spending the last bomb, as covered in How to play co-op.
Synergy table
| Partner weapon | Beam role |
|---|---|
| Power Shot | Beam focuses boss; Power covers sides |
| Homing Shot | Beam holds line; Homing cleans leaks |
| Thunder Laser | Usually redundant — pick one single-target focus |
| Star-Mine | Beam for shaft; Star-Mine for cluster rooms |
Practice plan
- Heart Starter: hold beam through one full early stage without horizontal panic.
- Training: loop one boss leg until pierce line stays connected for the full phase.
- Arcade: note capsule locations where switching off beam saved time — build a personal switch map.
- Use the weapon picker tool to confirm beam fits your selected mode before marathon attempts.
Consult the Weapons hub for capsule colors and links to every alternate primary.
Frequently Asked Questions
Quick answers to the most common questions.
Is Tatsujin Beam the same as Truxton Beam?
Yes. Official materials use both names for the same forward-focused pierce weapon in Truxton Extreme.
Does the beam pierce through bosses?
The beam pierces through stacked enemies in its forward line. Boss phase behavior depends on hitbox layout — some parts block or clip the line, requiring repositioning like classic shmup boss fights.
Is beam better than Thunder Laser?
Beam rewards manual alignment and higher skill expression; Thunder Laser locks on after contact and suits players who must dodge while maintaining damage. See the tier list for mode-specific rankings.
When should I switch from beam to Power Shot?
Switch when the next wave splits wide or spawns heavy side traffic you cannot reach without leaving your safe pierce line for several seconds.
Does EX Shot change beam width?
EX Shot increases fire density during its active window while your primary type remains beam-based. Use it during confirmed pierce lines, not while repositioning.