Truxton Extreme Boss Fight Guide
Read patterns, manage space, and know when to spend bombs.
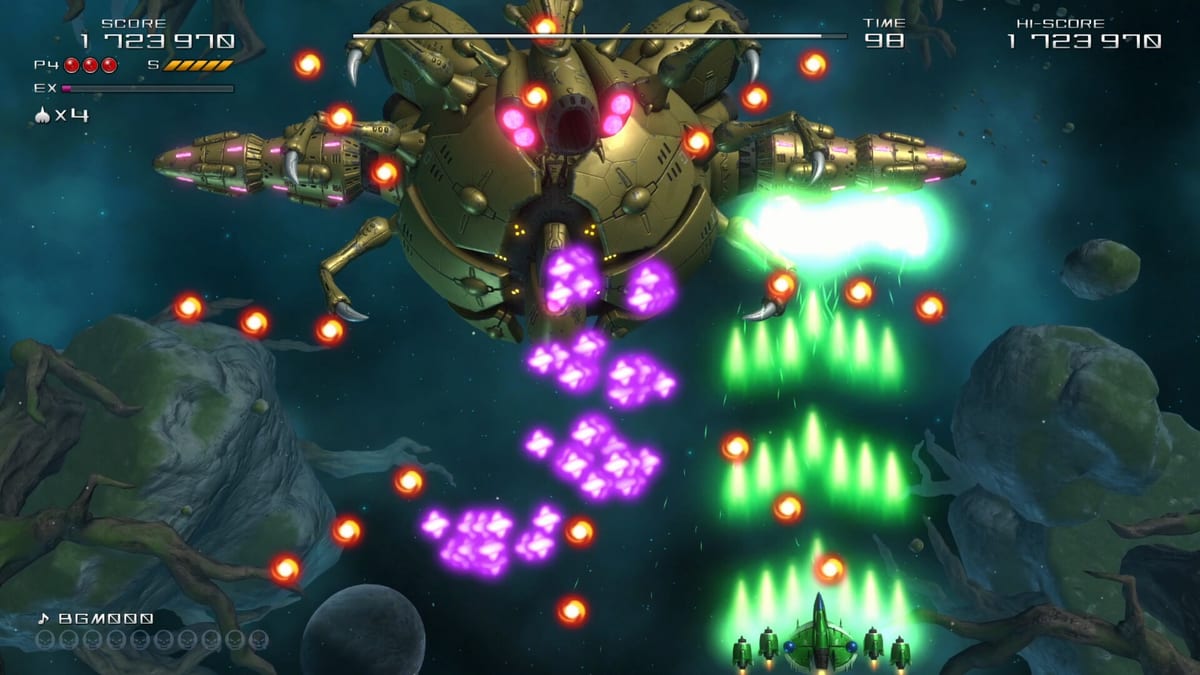
How bosses work in Truxton Extreme
Every major stage ends with a large mechanical or bio-mechanical encounter consistent with Truxton’s legacy of insectoid faces, coiling serpents, and spike-covered hulls. Bosses gate progression in Story and Arcade, and they represent the largest score spikes if you destroy segments cleanly without wasting bombs.
This guide focuses on reusable habits — positioning, phase recognition, resource timing — rather than a roster of proper names. Pre-release materials and reviews describe gigantic end-stage threats but rarely label each encounter on screen. Inventing names would mislead wiki readers, so we teach you how to learn any boss organically.
General phase structure
Most Truxton Extreme bosses follow arcade shmup phase logic:
- Opening pattern — slower bullet density while you establish weapon level and EX meter.
- Mid-phase escalation — additional spawn points activate, often from top corners or side ports.
- Desperation burst — higher speed streams, sometimes combined with smaller add-on enemies.
- Destroy sequence — visual break apart, score tally, optional item shower if EX was active.
Watch the boss sprite and background anchors rather than staring at your ship. When color shifts, audio stingers change, or attachment pieces detach, assume a pattern swap is incoming and reposition before the new stream begins.
Space management in 3D presentation
Critics praise readable 3D models because bullet paths remain legible compared with cluttered bullet-hell titles. Still, depth cues can trick you into misjudging safe zones. Keep your hitbox near the lower third unless a pattern forces temporary upward aggression.
Manual speed control matters more during bosses than during popcorn enemies. Slow down when learning a new phase; boost only when you have memorized safe lanes. Details sit in controls and how to play.
Weapon choice for sustained fights
Beam and homing variants help maintain damage while you dodge. Spread shots clear add-on ships that bosses spawn to pressure you sideways. Star-mine and wide coverage tools punish stationary weak points if the boss anchors center screen.
Enter boss arenas with at least level-two power if possible. Dropping to level zero because you chased the wrong color pickup is a common wipe cause. In co-op, coordinate colors so one player maintains consistent DPS — see co-op guide.
EX gauge discipline
EX supercharges damage but often slows movement. Boss phases with dense walls are poor EX timing unless you know a brief calm window follows. Better moments include add-on waves that feed meter quickly, then a short vulnerability window where boosted DPS deletes a phase faster.
Nintendo Life highlights EX kills dropping extra score items. Boss segments destroyed under EX can accelerate scoring goals when chasing Arena unlock thresholds.
Bomb usage philosophy
Bombs erase bullets and deal heavy damage. On bosses, use them to survive learning a pattern, not to skip learning entirely. A bomb that prevents death while you memorize phase two is valuable. A bomb burned during harmless opening patterns is wasted.
In Team mode, bombs double as revive tools. Do not enter a unfamiliar boss with zero bombs — keep one in reserve for partner rescue or panic clears.
Story versus Arcade pressure
Story checkpoints and Heart Starter forgiveness reduce boss frustration for newcomers. Arcade and high-level Story episodes expect cleaner play. Reviews mention checkpoint critique — some players dislike restarting long segments after a late boss mistake. If that describes you, practice the boss via Training once unlocked in mode unlock guide, or replay the stage in Heart Starter to study patterns safely.
Reading add-on enemies
Bosses frequently spawn smaller ships or turrets. Clearing add-ons first reduces bullet volume and may feed EX meter. However, focusing only on adds can timeout your damage on the main body if the game uses phase timers internally — stay aware of DPS requirements.
Homing weapons excel here because they continue damaging the boss while you address side spawns. Assign co-op roles: one player clears adds, one player maintains boss damage.
Audio and visual tells
Masahiro Yuge’s soundtrack often telegraphs intensity spikes. Rising tempo or drum fills may coincide with pattern changes even before bullets visually shift. Animation loops that stutter or repeat faster are another tell.
Model Viewer unlocks let you inspect defeated enemies later — useful if you want to study geometry without pressure. Pipiru rescues during boss stages still matter for metagame progression.
When to extend fights for score
Score runners sometimes delay phase transitions to milk EX chains on add-ons. This is advanced play and increases wipe risk. If you only need campaign progress, prioritize safe phase clears over greed.
Arena mode uses different time constraints — two-minute bursts — so boss-specific endurance skills translate indirectly. See scoring guide for mode-specific priorities.
Character routes and narrative framing
Ash, Bergamot, and Cyrilla Story routes reuse many stages with different manga framing. Boss arenas are largely shared, so skills transfer between characters. Narrative motivation changes tone but not hitboxes — character profiles help role-play, not dodge patterns.
Practical study routine
- Reach the boss with your preferred weapon at level two or three.
- Die intentionally once while watching patterns without bombing — note spawn corners.
- Retry using one bomb maximum during the phase you least understand.
- Record a phone video of stubborn phases if Training mode lacks direct boss select.
- Return in co-op if solo timing feels tight; shared lives reduce frustration.
Honest difficulty expectations
Reviews call bosses challenging but fair relative to classic arcade standards. They are not infinite bullet curtains; they are readable with practice. If difficulty still feels wrong, verify Options life inflation and autofire settings before blaming pattern design.
For purchase context and mode recommendations around difficulty, see the review hub.
Frequently Asked Questions
Quick answers to the most common questions.
Does this guide list every boss by name?
No. We teach pattern-reading habits because official on-screen boss names are not consistently documented in public materials.
Should I use bombs on bosses immediately?
Save bombs for unknown phases or emergencies. Wasting bombs early leaves you vulnerable during escalation patterns.
Is EX safe to use during bosses?
EX boosts damage but often slows movement. Activate during calm windows or when add-on waves feed meter quickly.
Do bosses differ between Story characters?
Stage layouts and boss arenas largely overlap across Ash, Bergamot, and Cyrilla routes with different story framing.
How can I practice without losing progress?
Use Heart Starter or Training mode when available, and replay earlier Story episodes you have unlocked.